How to Transfer a Balance from One Account to Another
The Transfer Account Balance screen allows you to transfer a customer’s balance (charge or credit) from one account to another account.
If, for example, a customer relocates to a new residence within the same service area, any balance associated with the previous account can be easily transferred to the new account.
Or, if a customer relocates to a new residence within the same service area and, while trying to make a payment against their new account, mistakenly applies the payment to their old account, the credit on the old account can easily be transferred and applied to the new account.
Security
Maintenance > new world ERP Suite > Security > Users
The security component Transfer Utility Account Balance was created for this feature. You will need this permission to be able to transfer account balances. ![]() Show me.
Show me.
Transferring a Balance
To transfer a balance from one account to another, do the following:
- Open the Customer Service screen: Utility Management > Customer Service.
- Use the controls in the Search pane to locate the account whose balance you would like to transfer to another account.
- In the Results pane, locate the account and click the Transactions attribute to display the Transactions screen.
-
In the Inquiry pane, click the Transfer Balance button at the bottom of the pane.
Note that certain restrictions apply to the balance transfer process. For example, only inactive accounts may be transferred. If you attempt to transfer a balance from an active account, the Transfer Balance button will be disabled.
Other restrictions include the following:
- The From account:
- Must be inactive
- Must have no pending transactions
- The To account must not:
- Have any pending credit transactions
- Be on a payment plan
- Be on budget bills
- Be on payment assistance
- The From account:
-
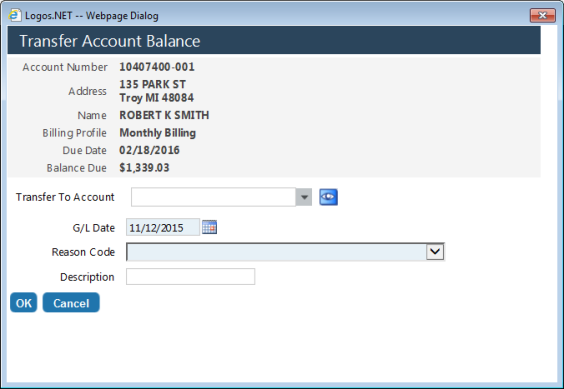
Once you click the Transfer Balance button, the Transfer Account Balance screen will appear. The upper portion of this screen is informational, displaying basic information from the selected account, i.e., the Transfer From Account.
The account balance, as indicated in the Balance Due field, is the amount that will be transferred from the selected account to the account entered in the Transfer To Account field. A credit balance is indicated with a negative sign.
-
In the required Transfer To Account field, enter the account to which the remaining balance should be transferred.
If the selected customer has been previously identified as a transfer customer via the Move In process, this field will default to the new account.
- Use the G/L Date field to indicate the date you would like associated with the transfer transaction, or bundle of transactions.
- In the required Reason Code field, enter the reason for the transfer.
-
Use the optional Description field to enter any additional information about the transfer.
This is a required field that defaults to the current date. To change the date, simply enter a new date or click the calendar icon to display the standard date control and select the date you want.
Note: Whether a balance transfer affects the general ledger depends on the specific transfer. Some transfers will create general ledger activity and some won’t. If any accounts receivable line items from the old account (i.e., the Transfer From account) differ from the new (Transfer To) account, then there will be general ledger activity. General ledger activity is created when the transfer is posted.
-
- Click OK. The balance will then be transferred to the selected Transfer To account.
See also:
Balance Transfers - An Overview
The Inactive Accounts with Balance Report

